Easy Black & White Conversion - Using Lightroom
This is a quick and simple guide to making a black and white image conversion, from a correctly exposed colour image using any version of Adobe Lightroom.
It could be useful for anyone starting to use Lightroom and also for those students undertaking part A of assignment 5 of The Photography Institute Diploma course.
You can see this view in the screen shot below, with the colour image on the left, the converted image on the right, and the B&W tab and the colour sliders on the far right. The TAT is just to the left of the colour sliders.
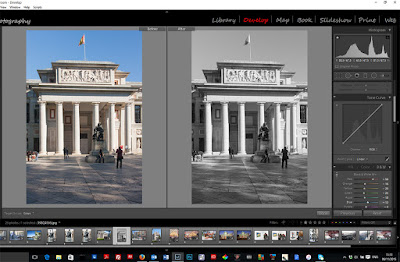
Left click and move up and down to change the saturation in various parts of the image. The black and white version will change (not the colour one) as you do this. It works very well when you get used to it and allows for very selective toning of the converted black and white image.
You can see my finished image below. I hope you enjoy using this quick and simple black and white conversion tool inside Lightroom.
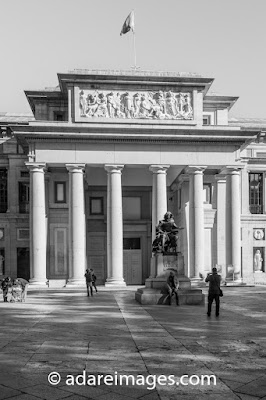
Click either image to expand them for a clearer view.
It could be useful for anyone starting to use Lightroom and also for those students undertaking part A of assignment 5 of The Photography Institute Diploma course.
- To get started, find your image to be converted to black and white in the library module of Lightroom, and then select it from the thumbnails at the bottom of the user interface or from the thumbnail view.
- Select the "Develop" module tab from the top of the Lightroom window.
- Click the B&W tab in Lightroom (along to the right from the Hue & Saturation tabs) to make a basic conversion.
- Then, use colour saturation sliders to change the various tones in the image. You will see them change as you move the various sliders.
You can see this view in the screen shot below, with the colour image on the left, the converted image on the right, and the B&W tab and the colour sliders on the far right. The TAT is just to the left of the colour sliders.

Left click and move up and down to change the saturation in various parts of the image. The black and white version will change (not the colour one) as you do this. It works very well when you get used to it and allows for very selective toning of the converted black and white image.
You can see my finished image below. I hope you enjoy using this quick and simple black and white conversion tool inside Lightroom.

Click either image to expand them for a clearer view.

Comments
Post a Comment
Please give your name when commenting.
All comments will be moderated, so please allow for a slight delay before your post appears on the Blog.