Sleeklens Portrait Perfection Photoshop Actions - Review
Sleeklens, based in Copenhagen, Denmark, is a relative newcomer to the digital imaging market. They provide a range of photographer’s ‘templates’ and presets for Lightroom and actions for Photoshop for various genres of photography, including travel, landscapes and portraiture.
The company was Co-Founded in 2015 by its current CEO, Daniel Chabert after he had become dissatisfied with the quality of similar products on the market. His view – which is one that I can concur with – is that many such products were a ‘quick fix’ or ‘all-in-one-solution’.
I was recently invited to try and review Sleeklens presets for Lightroom and actions for Photoshop, that are aimed at the portrait photographer.
In this review, I will take a closer look at the Portrait Perfection Collection, which
comprises a set of 56 Photoshop actions that are compatible with Photoshop
versions CS 4 to CS6 and Photoshop CC.
The actions work with both JPEG and RAW images and are compatible with computers
running Mac and Windows operating systems. The package also includes a ‘recipe
list’, installation guide and sample images.
For those not familiar with Photoshop actions, they are basically a series of separate adjustments that are combined and recorded together with an identifiable name and then “played back" to produce a specific result on the image.
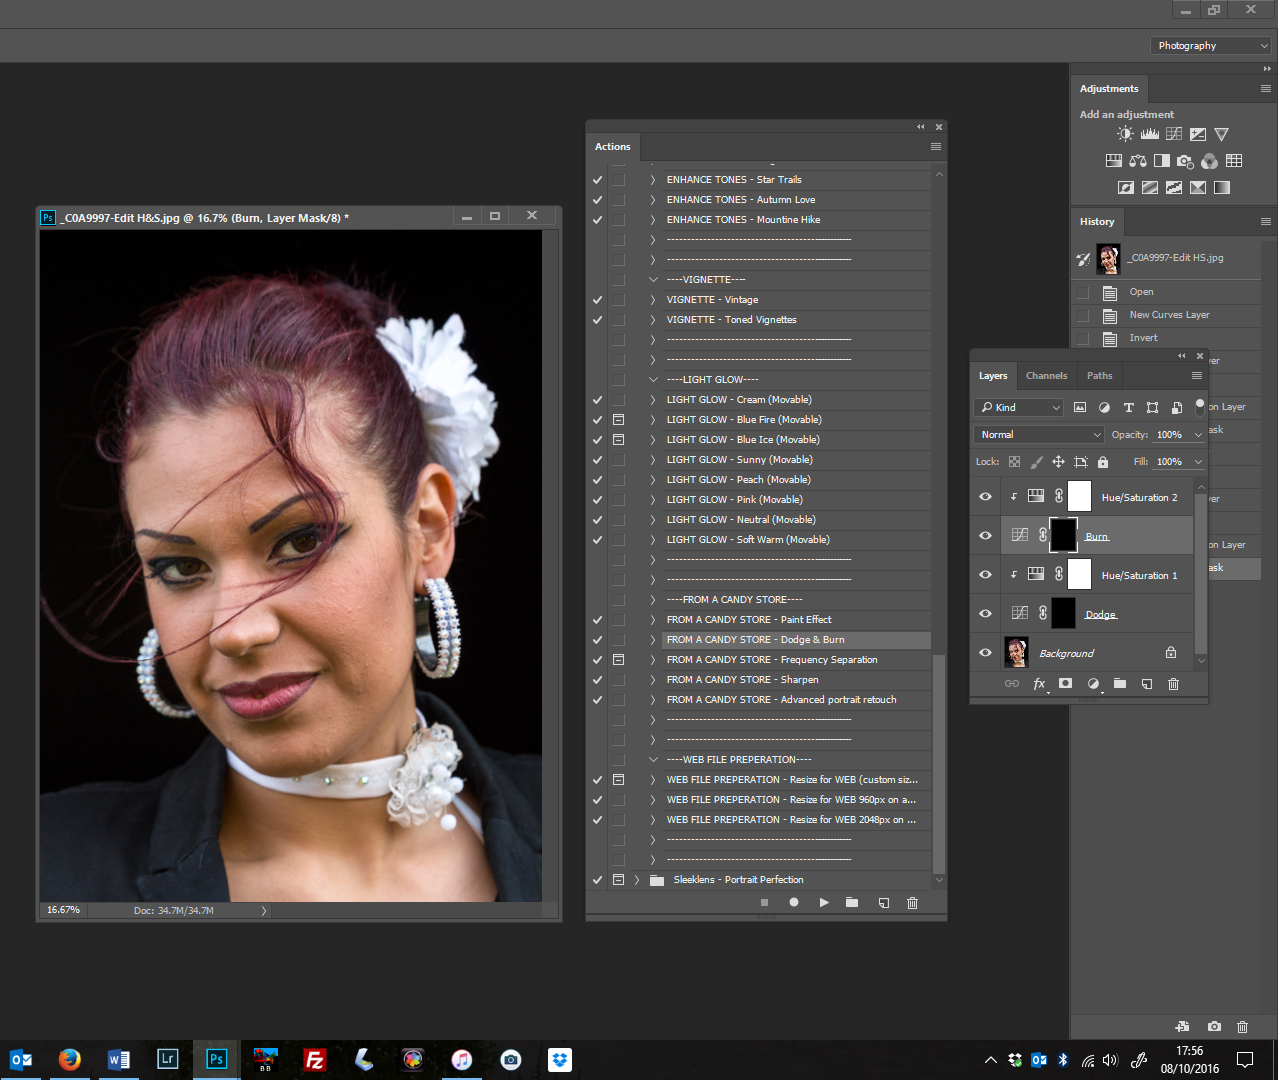 |
| Sleeklens Portraiture Perfection Actions Pallet Open in Photoshop CC |
For example; if you wanted to add a certain amount of exposure, ‘Unsharp Mask’ sharpening, plus a set amount Vibrance to each image you were editing in Photoshop, you could create a simple 3 step action to run on each image, which would add the adjustments for you automatically.
Actions can be much more complex, though, and often involve multiple steps including opening tone curves, blending layers and adding layer masks and other high-level Photoshop adjustments. This is the case with many of the actions in the Sleeklens Portrait Perfection Collection, which have upwards of 30 or 40 separate adjustments which combine to provide the overall final effect on the image.
Not only would this be a very time-consuming process should you try to do it yourself, from scratch, for each image, but it also takes skill and patience to mix the various adjustments into a pleasing and useful effect.
Sleeklens have done the hard work for you here. If you consider that there are 56 actions in the package, it adds up to a huge amount of saved time and effort (not to mention technical ability). They are sub-divided into discreet groups with the heading that include “All-in-One”, “Base”, “Exposure”, “Temperature”, “Color Correction”, “Portrait Retouch” and “Enhance Tones” which give a general idea of what the actions in group actually do. There is a group called “From a Candy Store”, which is less obvious and needs some experimentation and another with the title “File Preparation” which needs no explanation at all.
Some of the actions in this package will give a single effect that is universally applied to the image. Others require you to work with the brush tool to apply the effect in specific areas of the image (for example on eyes or teeth or eyebrows).
However, most of the universal effects can be adjusted in strength via use of the opacity sliders and all of them can be mixed and matched with other actions in the set for a virtually unlimited combination of effects, to suit the image being adjusted.
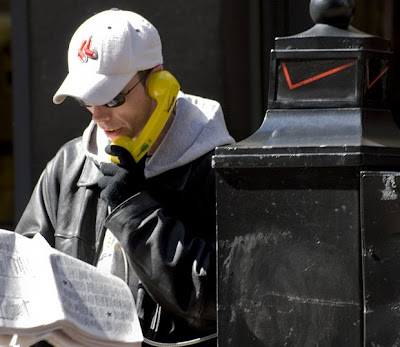
Although the extensive video tutorials use female models, I started my tests by using actions in the “Base”, “Color Correction” and “Portrait Retouch” groups on a male subject. Admittedly, he is wearing a lot of makeup, but it worth suggesting that while portraits of women may be the staple use for this package, it’s by no means the only way to use it.
I began by applying the universal “From Scratch” action in the “Base” group, which lifted the contrast and slightly increased the exposure of the original image. I then used the “Less Orange Juice” action, from the Color Correction group and applied it to his face with the brush tool, which reduced the intensity of his makeup.
I then ran the “Fast Retouch (eyes, skin & teeth)” action, in the Portrait Retouch group, to add local adjustments with the brush tool, to whiten his teeth and the whites of his eyes and other adjustments to enhance his eye lashes and bring out the colour of his pupils.
 |
| Original Image |
 |
| With Sleeklens Portraiture Actions Applied |
Because of the infinitesimal variety of changes you can make, the final image is down to your creativity and "eye" for the image that works best. There is also, of course, plenty of scope to make more than one edit of the same image to show clients in order to the get their view on the best one for their use.
I generally prefer my images to be enhanced without the changes being too obvious. I'm not one for over-use of HDR or too-vibrant colours and so I was delighted to find that the actions can be adjusted in such a way that the changes I made to the female image remained close to the original shot, but with positive enhancements.
In the image below, on the right, I used some of the actions from the "From A Candy Store" and "Portrait Retouch" groups to soften the skin, reduce the highlights on her cheeks, add contours to the nose and chin areas, add a glossy sheen to her lips and to brighten and enhance her eyes. I also used the Spot Healing Brush Tool to remove the highlights on the sunglasses, which detracted the viewer's eye from her face.
 |
| Original Image |
 |
| With Sleeklens Portraiture Actions Applied |
In my view; The Sleeklens Portraiture Perfection Collection is a very comprehensive set of actions for Photoshop that will be useful to all portrait photographers wishing to enhance their images, whether in a subtle or more visually striking way.
The package is very comprehensive and certainly is likely to take some time and practice to get the most out of it. The more you use it and perhaps even combine it with existing Photoshop tools (such as the Healing brushes and Clone tools) the more versatile it is likely to become.
That said, it does not necessarily require advanced Photoshop skills, beyond being able to adjust brush size, opacity levels and being aware of how to click into layer masks and flatten image layers. Much of this is also covered in the very detailed video tutorials supplied with the package.
Highly Recommended

Comments
Post a Comment
Please give your name when commenting.
All comments will be moderated, so please allow for a slight delay before your post appears on the Blog.